
This is the Science Experiment that you can do by your self in Home or our School.
Activities in this guide require adult supervision!

___________________________________________________________________________

Membuat Alat Peraga Jantung
Praktikum IPA
Bahan :
- 6 botol plastik bekas
- 3 meter selang kecil 0,8mm
- 2 buah ballpoint pegas* (bekas)
- Papan triplek 40 x 60 cm
- Pewarna merah (Tinta Printer) secukupnya
- 2 buah gotri kecil / kelereng / gundu
- Busa Karet

Alat :
- Pisau Cutter
- Solder
- Lem Silicon Rubber
- Lem Alteco
- Lem Castol
Cara pembuatan alat :
· Botol dilubangi bagian atas dan bawah
menggunakan Solder sesuai dengan diameter selang.
· Siapkan triplek , lalu atur posisi 6
buah botol tersebut sesuai dengan gambar.
· Potong Busa karet sebanyak 6 bagian
sesuai ukuran. Rekatkan semua busa karet pada triplek menggunakan Lem kastol,
lalu rekatkan semua Botol pada busa karet (sebagai tumpuan).
· Untuk membuat katub, potong ballpoint
dan ambil isinya, sisakan pegas dan dudukannya. Masukan gotri hingga
gotri terkunci oleh per dan ujung ulir ballpoint. Sehingga gotri dan per
akan selalu bergerak untuk membuka dan menutup ketika mendapat tekanan.
·
*(Ballpoint yang digunakan adalah jenis
GEL PEN bekas,)
· Sambungkan botol satu dengan yang lain dengan
selang. Alur penyambungan selang terdapat pada gambar disamping.
Tambahkan Lem ALTECO di penyambungan selang jika terasa longgar.
· Pasang katub dari ballpoint di antara
bilik dan serambi seperti pada gambar.
· Pastikan Setiap sambungan benar benar
kedap udara dengan menambahkan lem SILICON RUBBER di sekitar sambungan selang.
· Rekatkan selang (pembuluh darah) pada
triplek.
· Campurkan air dengan pewarna merah, lalu
masukan air (darah) tersebut ke alat melalui bagian “paru-paru ” atau “tubuh”

Perdatrans
Cara Kerja Alat :
1. Pada saat bilik kiri jantung ditekan
air akan mengalir dari bilik kiri ke seluruh tubuh melalui pembuluh nadi,
kemudian menuju ke serambi kanan melalui pembuluh balik. Pada saat ditekan, air
dari bilik kiri tidak bisa kembali / bercampur ke serambi kiri, pada saat
ditekan katub akan menutup dan pada saat dilepas air akan turun dari serambi ke
bilik kiri.
2. Hal yang sama terjadi jika bilik
kanan ditekan. Air akan mengalir dari bilik kanan ke paru – paru melalui
pembuluh nadi paru-paru, kemudian menuju serambi kiri melalui pembuluh balik
paru-paru. Pada saat bilik kanan ditekan, air dari bilik kanan tidak bisa
kembali / bercampur ke serambi kiri. Karena fungsi kerja katub.
3. Dalam alat ini, ketika salah satu bilik ditekan akan terjadi simulasi proses peredaran darah dari jantung ke paru-paru dan seluruh tubuh. seluruh botol terhubung dengan selang (sebagai pembuluh darah) dan katub bekerja dalam waktu bersamaan meskipun hanya satu bilik yang ditekan. Sehingga air (darah) bersirkulasi layaknya system peredaran darah manusia.
3. Dalam alat ini, ketika salah satu bilik ditekan akan terjadi simulasi proses peredaran darah dari jantung ke paru-paru dan seluruh tubuh. seluruh botol terhubung dengan selang (sebagai pembuluh darah) dan katub bekerja dalam waktu bersamaan meskipun hanya satu bilik yang ditekan. Sehingga air (darah) bersirkulasi layaknya system peredaran darah manusia.
"Oobleck"

What you need:
1 cup cornstarch (Maizena)
bowl
ABOUT 1/2 cup water
spoon
pie plate
food coloring
Directions:
Empty 1 cup of cornstarch into a large bowl.
Stir while you add water SLOWLY -- don't add all of it if you don't need to.
You need the consistency of thick pancake batter.
It's better to add too little water than too much.
Take your time!
Add a few drops of food coloring.
Stick your hands in the mixture.
Record what it feels like.
What happens when you try to roll some into a ball and then leave it alone?
Pour the water into a pie plate. (water is a liquid)
smack it with your hand
record what happens
Empty the pie plate. Pour the cornstarch mixture into a pie plate.
smack it with your hand
record what happens
does it act differently than the water?
What Happened:
When we talk about "states" of matter, we usually talk about the three types: solid (like a rock), liquid (like water) and gas (like the air we breath).
A mixture of cornstarch and water make what is known as a suspension. When you squeeze a Cornstarch Suspension it really feels like a solid because its molecules line up. But it looks like a liquid and acts like a liquid when no one is pressing on it because the molecules relax. This is another state of matter, called a suspension (It can act like a liquid, or, when pressed like a solid.).
___________________________________________________________________________
 "MAKE AN ELECTROMAGNET"

You will need
A large iron nail (about 3 inches)
About 3 feet of THIN COATED copper wire
A fresh D size battery
Some paper clips or other small magnetic objects
 Directions:
- Leave about 8 inches of wire loose at one end and wrap most of the rest of the wire around the nail. Try not to overlap the wires.
- Cut the wire (if needed) so that there is about another 8 inches loose at the other end too.
- Now remove about an inch of the plastic coating from both ends of the wire and attach the one wire to one end of a battery and the other wire to the other end of the battery. See picture below. (It is best to tape the wires to the battery – be careful though, the wire could get very hot!)
- Now you have an ELECTROMAGNET! Put the point of the nail near a few paper clips and it should pick them up!

NOTE:
Making an electromagnet uses up the battery somewhat quickly which is why the battery may get warm, so disconnect the wires when you are done exploring.
What Happened? How does it work?
Most magnets, like the ones on many refrigerators, cannot be turned off, they are called permanent magnets. Magnets like the one you made that can be turned on and off, are called ELECTROMAGNETS. They run on electricity and are only magnetic when the electricity is flowing. The electricity flowing through the wire arranges the molecules in the nail so that they are attracted to certain metals. NEVER get the wires of the electromagnet near at household outlet! Be safe – have fun!
MAKE IT AN EXPERIMENT
The project above is a DEMONSTRATION. To make it a true experiment, you can try to answer these questions:
1. Does the number of times you wrap the wire around the nail affect the strength of the nail?
2. Does the thickness or length of the nail affect the electromagnets strength?
3. Does the thickness of the wire affect the power of the electromagnet?
___________________________________________________________________________
"Make an Egg Float in Salt Water"
What you'll need:
One egg
Water
Salt
A tall drinking glass
Instructions:
Pour water into the glass until it is about half full.
Stir in lots of salt (about 6 tablespoons).
Carefully pour in plain water until the glass is nearly full (be careful to not disturb or mix the salty water with the plain water).
Gently lower the egg into the water and watch what happens.
What's happening?
Salt water is denser than ordinary tap water, the denser the liquid the easier it is for an object to float in it. When you lower the egg into the liquid it drops through the normal tap water until it reaches the salty water, at this point the water is dense enough for the egg to float. If you were careful when you added the tap water to the salt water, they will not have mixed, enabling the egg to amazingly float in the middle of the glass.
___________________________________________________________________________
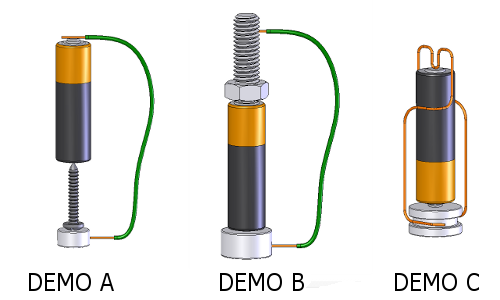
"Make a Homopolar Motor"
Goal:
To make the simplest motor out of common parts to entertain and intrigue minors.
Simple DC Motor Parts:
- 15 cm cooper wire
- AA Battery
- Permanent magnet o Neodymium magnet
Observation:
Try with other scenario:
___________________________________________________________________________
Baby Diaper Secret
If you've
changed a diaper, you've uncovered polymers.
If you've ever changed a diaper and noticed what looked like tiny crystals
on the baby's skin, you've uncovered the secret of superabsorbent, disposable
diapers. Those tiny crystals actually come from the lining of the diaper and
are made out of a safe, non-toxic polymer that absorbs moisture away from the
baby's skin.Materials
- Disposable diapers (several brands)
- Zipper-lock bag
- Scissors
- 8-ounce plastic cup
- Water
- Newspaper
- Salt
- Spoon
Experiment
- Place a new (unused is your first choice) diaper on the piece of newspaper. Carefully cut through the inside lining and remove all the cotton-like material. Put all the stuffing material into a clean, zipper-lock bag.
- Scoop up any of the polymer that may have spilled onto the paper and pour it into the bag with the stuffing. Blow a little air into the bag to make it puff up like a pillow, then seal the bag.
- Shake the bag for a few minutes to remove the powdery polymer from the stuffing. Notice how much (or how little) powder falls to the bottom of the bag.
- Carefully remove the stuffing from the bag and check out the dry polymer you just extracted from the diaper.
- Pour the polymer into a plastic cup and fill the cup with water. Mix it with your finger until the mixture begins to thicken.
- Observe the gel that the polymer and water create. Turn the cup upside-down and see how it has solidified. Take it out and play with it. Amazing stuff!
- Put the pieces of gel back into the cup and smoosh them down with your fingers. Add a teaspoon of salt, stir it with a spoon and watch what happens. Salt messes up the gel's water-holding abilities. When you're finished, pour the salt water goo down the drain.
- Grab a new diaper and slowly pour about 1/4 cup of warm tap water into the center of the diaper. Hold the diaper over a large pan or sink and continue to add water, a little at a time, until it will hold no more. Keep track of how much water the diaper can absorb before it begins to leak.
How Does It Work?
The secret
water-absorbing chemical in a diaper is a superabsorbent polymer called sodium
polyacrylate. A polymer is simply a long chain of repeating molecules.
If the prefix "poly" means many, then a polymer is a large molecule
made up of many smaller units, called monomers, which are joined
together. Some polymers are made up of millions of monomers.
Superabsorbent
polymers expand tremendously when they come in contact with water because water
is drawn into and held by the molecules of the polymer. They act like giant
sponges. Some can soak up as much as 800 times their weight in water! That
would be one wet baby!
The
cotton-like fibers you removed from the diaper help to spread out both the
polymer and the, uh, "water" so that baby doesn't have to sit on a
gooshy lump of water-filled gel. It's easy to see that even a little bit of
powder will hold a huge quantity of water, but it does have its limits. At some
point, baby will certainly let you know that the gel is full and it's time for
new undies!
In spite of
their usefulness, these diapers can be a problem. If you've ever observed a
baby in diapers splashing in a wading pool, you know that even one diaper can
absorb lots and lots of water. Most public pools won't allow them to be worn in
the water because huge globs of gooey gel can leak out and make a mess of the
filter system. Also, some folks used to throw them away in toilets - not a good
idea unless you're a plumber. For the most part, however, these diapers are a
great invention and make for dry, happy babies.
Additional Info
Science Fair
Connection:
A good
science fair project changes something, creates a
new experiment, and compares the results.
- Change the brand of diaper and, using the steps listed above, test it to see just how much water it will absorb. Compare your results to the absorbency of the first diaper you tested.
The brand of
diaper is the variable in this experiment. Be sure to use the same size
of diaper even though you are using different brands. If you test a large
Pampers diaper against a newborn-sized Huggies diaper, your results will not be
reliable. Everything needs to stay the same except for the brand of diaper.
You'll find out extremely quickly if you get what you pay for or if there
really isn't a difference between the brands. Document your discoveries
and share them at the science fair. Many moms with young children will thank
you for your research!
___________________________________________________________________________
___________________________________________________________________________
___________________________________________________________________________
___________________________________________________________________________
___________________________________________________________________________

hi mr.
ReplyDelete